■XMLでリニアレイアウト
リニアレイアウトは縦向き、もしくは横向きに順番に表示していくレイアウトです。
レイアウトには色々な種類がありますが、よく使うのを書いときます
●FrameLayout(Viewを重ねあわせて配置)
●LinearLayout(Viewを縦もしくは横の一方向に順番に配置)
●RelativeLayout(View同士の位置関係から相対的に配置)
javaのコードで書きたかったのですが、色々試してもうまくいきませんでした。
     XXX.setLayoutParams(new android.widget.LinearLayout.LayoutParams(
        android.widget.LinearLayout.LayoutParams.MATCH_PARENT,
        android.widget.LinearLayout.LayoutParams.MATCH_PARENT));
     XXX.setOrientation(android.widget.LinearLayout.VERTICAL);
     XXX.addView(tv,new android.view.ViewGroup.LayoutParams(android.view.ViewGroup.LayoutParams.MATCH_PARENT
        ,android.view.ViewGroup.LayoutParams.MATCH_PARENT));
     XXX.setGravity(android.view.Gravity.BOTTOM);
javaでリニアレイアウト
とかやってみたのですが、なぜか目的のレイアウトになりません。
諦めてXMLで表現することにします。
まずは、XMLによく使いそうな文から。
android:orientation="vertical"
  horizontal 横向き
  vertical 縦向き

android:layout_width="match_parent"
  match_parent いっぱいに広がる
  wrap_content サイズを自動調整
  1000dp    サイズ指定

android:gravity="center"
  center    真ん中に
  center_vertical 縦の真ん中に
  center_horizontal 横の真ん中に
  center|bottom 真ん中の下に
  center|top  真ん中の上に
  right|bottom 右側の下に
  left|bottom 左側の下に
  fill     いっぱいに広がる
  fill_vertical 高さをいっぱいに広げる
  fill_horizontal 横幅をいっぱいに広げる
■リニアレイアウトにボタンを並べてみます。
<?xml version="1.0" encoding="utf-8"?>
<LinearLayout xmlns:android="http://schemas.android.com/apk/res/android"
        android:orientation="horizontal"
        android:layout_width="match_parent"
        android:layout_height="match_parent">

    <Button
        android:text="Button"
        android:layout_width="wrap_content"
        android:layout_height="wrap_content"
        android:layout_weight="1" />

    <Button
        android:text="Button"
        android:layout_width="wrap_content"
        android:layout_height="wrap_content"
        android:layout_weight="2" />
    <Button
        android:text="Button"
        android:layout_width="wrap_content"
        android:layout_height="wrap_content"
        android:layout_weight="3" />
</LinearLayout>
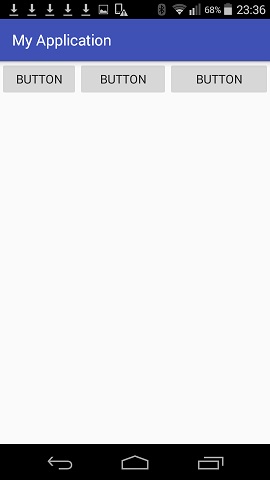
orientation="horizontal"のため、横向きに並んでいます、また、layout_weight="3" の違いにより幅が変化しています。
■リニアレイアウトに縦向きで並べてみる
<?xml version="1.0" encoding="utf-8"?>
<LinearLayout xmlns:android="http://schemas.android.com/apk/res/android"
        android:orientation="vertical"
        android:layout_width="match_parent"
        android:layout_height="match_parent">

    <Button
        android:text="Button"
        android:layout_width="wrap_content"
        android:layout_height="wrap_content"
        android:layout_weight="1" />

    <Button
        android:text="Button"
        android:layout_width="wrap_content"
        android:layout_height="wrap_content"
        android:layout_weight="2" />
    <Button
        android:text="Button"
        android:layout_width="wrap_content"
        android:layout_height="wrap_content"
        android:layout_weight="3" />
</LinearLayout>
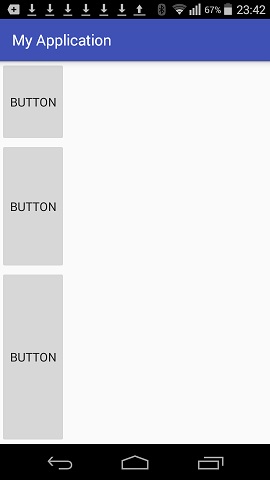
orientation="vertical"のため、縦向きに並んでいます。
またlayout_weight="3" の違いにより高さが変化しています。
■layout_weightの大きさを変えてみる
<?xml version="1.0" encoding="utf-8"?>
<LinearLayout xmlns:android="http://schemas.android.com/apk/res/android"
        android:orientation="vertical"
        android:layout_width="match_parent"
        android:layout_height="match_parent">

    <Button
        android:text="Button"
        android:layout_width="wrap_content"
        android:layout_height="wrap_content"
        android:layout_weight="1" />

    <Button
        android:text="Button"
        android:layout_width="wrap_content"
        android:layout_height="wrap_content"
        android:layout_weight="10" />
    <Button
        android:text="Button"
        android:layout_width="wrap_content"
        android:layout_height="wrap_content"
        android:layout_weight="1" />
</LinearLayout>
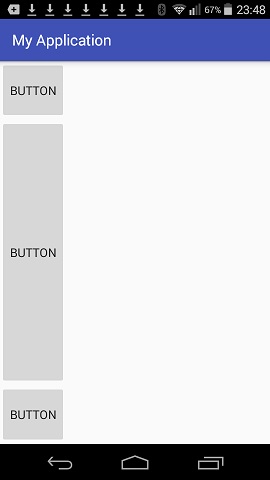
layout_weightの値の違いにより高さが変化しています。
■縦向きリニアレイアウトの中に横向きリニアレイアウトを入れる
<?xml version="1.0" encoding="utf-8"?>
<LinearLayout xmlns:android="http://schemas.android.com/apk/res/android"
        android:orientation="vertical"
        android:layout_width="match_parent"
        android:layout_height="match_parent">

    <Button
        android:text="Button"
        android:layout_width="wrap_content"
        android:layout_height="wrap_content"
        android:gravity="fill"
        android:layout_weight="1" />
    <Button
        android:text="Button"
        android:layout_width="wrap_content"
        android:layout_height="wrap_content"
        android:layout_weight="10" />
    <LinearLayout
        android:orientation="horizontal"
        android:layout_width="match_parent"
        android:layout_height="wrap_content"
        android:gravity="center"
        android:layout_weight="0">
        <Button
            android:text="Button"
            android:layout_width="wrap_content"
            android:layout_height="wrap_content" />
    </LinearLayout>
</LinearLayout>
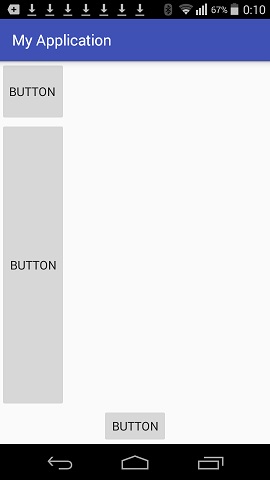
画面一番下に横向きリニアレイアウトを入れました。
gravity="center"のため、ボタンがセンターに配置されています。
■一番下にボタンを配置する
<?xml version="1.0" encoding="utf-8"?>
<LinearLayout xmlns:android="http://schemas.android.com/apk/res/android"
        android:orientation="vertical"
        android:layout_width="match_parent"
        android:layout_height="match_parent">
    <Button
        android:text="Button"
        android:layout_width="wrap_content"
        android:layout_height="wrap_content"
        android:layout_weight="10" />
    <LinearLayout
        android:orientation="horizontal"
        android:layout_width="match_parent"
        android:layout_height="wrap_content"
        android:gravity="center"
        android:layout_weight="0">
        <Button
            android:text="Button"
            android:layout_width="wrap_content"
            android:layout_height="wrap_content" />
        <Button
            android:text="Button"
            android:layout_width="wrap_content"
            android:layout_height="wrap_content" />
        <Button
            android:text="Button"
            android:layout_width="wrap_content"
            android:layout_height="wrap_content" />
    </LinearLayout>
</LinearLayout>
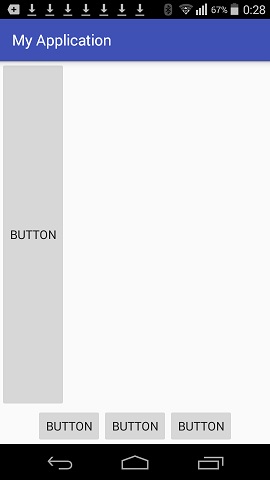
一番下のリニアレイアウトにボタンを3個並べてみました。
一番下にボタンを並べて操作するのに使えそうですね。
あと、各々のパーツにIDを与えておくとjavaから操作できます。
ていうか、IDを与えておかないと取得できませんね。
android:id="@+id/button2"
▲トップページ
>
android