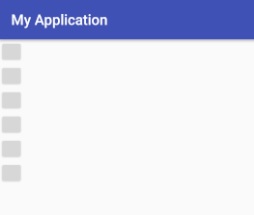
●javaでリニアレイアウト
リニアレイアウトは縦一列や横一列に配置するレイアウトです。
標準では横一列にレイアウトされます。
もし、横幅いっぱいになってはみ出したとしても折り返される事はありません。
ちなみに100,100はサイズの指定です。
android.widget.LinearLayout ll = new android.widget.LinearLayout(this);
ll.addView(new android.widget.Button(this),100,100);
ll.addView(new android.widget.Button(this),100,100);
ll.addView(new android.widget.Button(this),100,100);
ll.addView(new android.widget.Button(this),100,100);
ll.addView(new android.widget.Button(this),100,100);
ll.addView(new android.widget.Button(this),100,100);
setContentView(ll);

■配置する方向の変更
標準では横向きでしたが、縦向きに変更すると縦向きにレイアウトされます。
android.widget.LinearLayout ll = new android.widget.LinearLayout(this);
ll.setOrientation(android.widget.LinearLayout.VERTICAL);
ll.addView(new android.widget.Button(this),100,100);
ll.addView(new android.widget.Button(this),100,100);
ll.addView(new android.widget.Button(this),100,100);
ll.addView(new android.widget.Button(this),100,100);
ll.addView(new android.widget.Button(this),100,100);
ll.addView(new android.widget.Button(this),100,100);
setContentView(ll);
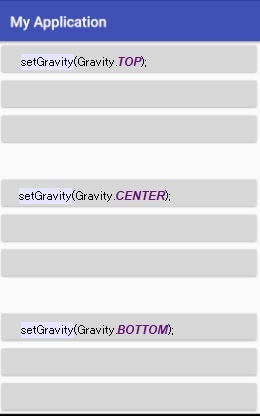
■配置する位置の変更
上とか真ん中とか下とか右とか左ですが、Gravityを指定することにより、
レイアウト内の重力を操り配置を整える事が出来ます。
android.widget.LinearLayout ll = new android.widget.LinearLayout(this);
ll.setGravity(android.view.Gravity.TOP);
ll.addView(new android.widget.Button(this));
ll.addView(new android.widget.Button(this));
ll.addView(new android.widget.Button(this));
setContentView(ll);
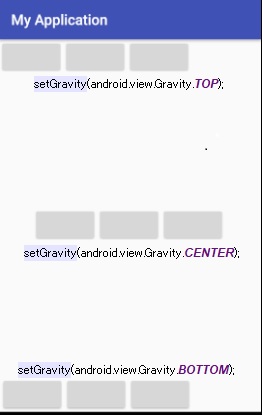
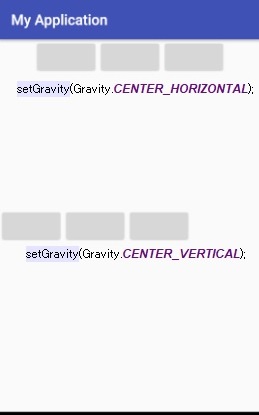
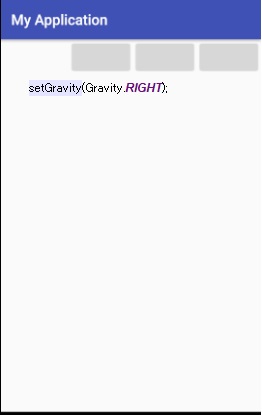
また、Gravityの値は | で複数指定することもできます。
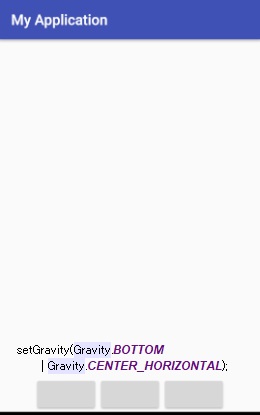
次に縦向きレイアウトに変更してみます。
android.widget.LinearLayout ll = new android.widget.LinearLayout(this);
ll.setOrientation(android.widget.LinearLayout.VERTICAL);
ll.setGravity(Gravity.TOP);
ll.addView(new android.widget.Button(this));
ll.addView(new android.widget.Button(this));
ll.addView(new android.widget.Button(this));
setContentView(ll);
■レイアウトのサイズ変更
LayoutParamsでサイズを指定することができます
高さと幅の値をピクセル単位で直接入力して指定する方法と、
定数を指定して動的に指定する方法があります。
定数のFILL_PARENTとMATCH_PARENTは、高さや幅をいっぱいに広げます。
WRAP_CONTENTは、必要なサイズに自動的に調整します。
android.widget.LinearLayout ll = new android.widget.LinearLayout(this);

android.widget.LinearLayout ll1 = new android.widget.LinearLayout(this);
ll1.setLayoutParams(new android.widget.LinearLayout.LayoutParams(100,100));
ll1.setBackgroundColor(android.graphics.Color.RED);

android.widget.LinearLayout ll2 = new android.widget.LinearLayout(this);
ll2.setLayoutParams(new android.widget.LinearLayout.LayoutParams(200,200));
ll2.setBackgroundColor(android.graphics.Color.GREEN);

android.widget.LinearLayout ll3 = new android.widget.LinearLayout(this);
ll3.setLayoutParams(new android.widget.LinearLayout.LayoutParams(
        android.widget.LinearLayout.LayoutParams.FILL_PARENT,
        android.widget.LinearLayout.LayoutParams.FILL_PARENT));
ll3.setBackgroundColor(android.graphics.Color.BLUE);


ll.addView(ll1);
ll.addView(ll2);
ll.addView(ll3);

setContentView(ll);
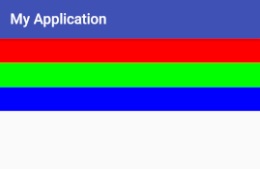
▼縦向きでサイズ変更する
横向きレイアウトを縦向きにして横方向は最大に広がるようにしました。
レイアウトがシマシマになります。
android.widget.LinearLayout ll = new android.widget.LinearLayout(this);
ll.setOrientation(android.widget.LinearLayout.VERTICAL);

android.widget.LinearLayout ll1 = new android.widget.LinearLayout(this);
ll1.setLayoutParams(new android.widget.LinearLayout.LayoutParams(
        LinearLayout.LayoutParams.MATCH_PARENT
        ,100));
ll1.setBackgroundColor(android.graphics.Color.RED);

android.widget.LinearLayout ll2 = new android.widget.LinearLayout(this);
ll2.setLayoutParams(new android.widget.LinearLayout.LayoutParams(
        LinearLayout.LayoutParams.MATCH_PARENT
        ,100));
ll2.setBackgroundColor(android.graphics.Color.GREEN);

android.widget.LinearLayout ll3 = new android.widget.LinearLayout(this);
ll3.setLayoutParams(new android.widget.LinearLayout.LayoutParams(
        LinearLayout.LayoutParams.MATCH_PARENT
        ,100));
ll3.setBackgroundColor(android.graphics.Color.BLUE);


ll.addView(ll1);
ll.addView(ll2);
ll.addView(ll3);

setContentView(ll);
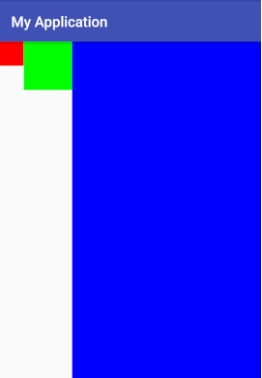
そこで、真ん中のレイアウトの高さを最大に広がるようにします。
理想的には赤と青の間に緑が最大に広げるのが目的ですが、残念な結果になります。
android.widget.LinearLayout ll = new android.widget.LinearLayout(this);
ll.setOrientation(android.widget.LinearLayout.VERTICAL);

android.widget.LinearLayout ll1 = new android.widget.LinearLayout(this);
ll1.setLayoutParams(new android.widget.LinearLayout.LayoutParams(
        LinearLayout.LayoutParams.MATCH_PARENT
        ,100));
ll1.setBackgroundColor(android.graphics.Color.RED);

android.widget.LinearLayout ll2 = new android.widget.LinearLayout(this);
ll2.setLayoutParams(new android.widget.LinearLayout.LayoutParams(
        LinearLayout.LayoutParams.MATCH_PARENT
        ,LinearLayout.LayoutParams.MATCH_PARENT));
ll2.setBackgroundColor(android.graphics.Color.GREEN);

android.widget.LinearLayout ll3 = new android.widget.LinearLayout(this);
ll3.setLayoutParams(new android.widget.LinearLayout.LayoutParams(
        LinearLayout.LayoutParams.MATCH_PARENT
        ,100));
ll3.setBackgroundColor(android.graphics.Color.BLUE);


ll.addView(ll1);
ll.addView(ll2);
ll.addView(ll3);

setContentView(ll);
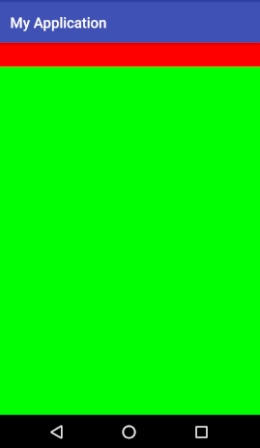
緑のレイアウトが先に最大に広がってしまい、後に配置したレイアウトが表示されなくなり、残念な結果になりました。
やはりXMLを使うしかないのでしょうか。
XMLでリニアレイアウト
▼プログラムでレイアウトサイズを調整する
よくよく考えてみるとリニアレイアウトの考え方から察するに、順番に配置される時に画面サイズから外れた場合には表示されないのは正しい動作だと思えてきました。
しかし、それでは、上と下にボタンなどをはさんだレイアウトが出来ないじゃないか・・・・
ならば、自動的にレイアウトが調整されないのなら自力で調整してしまうことにします。
まずは、レイアウトの変数のスコープを拡大してイベントでも処理できるようにしました。
@Override
public void onWindowFocusChanged(boolean hasFocus) {
        android.view.ViewGroup.LayoutParams params = ll2.getLayoutParams();
        params.height = ll2.getHeight() - ll3.getHeight();
        ll2.setLayoutParams(params);
}
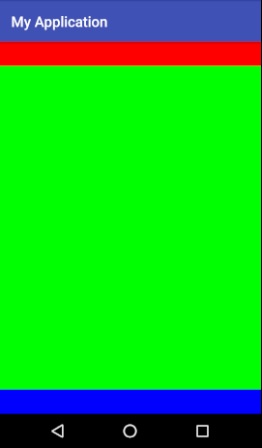
onWindowFocusChangedはフォーカスが変化した時に呼ばれます。
その中で、真ん中の最大に広がったレイアウトから、最後に配置するレイアウトの高さを引いています。
そうすることにより、真ん中のレイアウトが最大の高さになり、最後のレイアウトも表示されます。
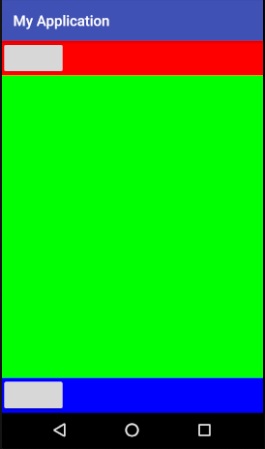
■上下の部分にボタンを配置する
上下のレイアウト部分にボタンなどを配置すると高さを決め打ちではうまくいきません。
そこで、ボタンを配置したレイアウトのみWRAP_CONTENTで必要な高さで表示されるようにします。
public class MainActivity extends AppCompatActivity {
    android.widget.LinearLayout ll,ll1,ll2,ll3;
    @Override
    protected void onCreate(Bundle savedInstanceState) {
        super.onCreate(savedInstanceState);

        ll = new android.widget.LinearLayout(this);
        ll.setOrientation(android.widget.LinearLayout.VERTICAL);

        ll1 = new android.widget.LinearLayout(this);
        ll1.setLayoutParams(new android.widget.LinearLayout.LayoutParams(
                LinearLayout.LayoutParams.MATCH_PARENT
                ,LinearLayout.LayoutParams.WRAP_CONTENT));
        ll1.addView(new android.widget.Button(this));
        ll1.setBackgroundColor(android.graphics.Color.RED);

        ll2 = new android.widget.LinearLayout(this);
        ll2.setLayoutParams(new android.widget.LinearLayout.LayoutParams(
                LinearLayout.LayoutParams.MATCH_PARENT
                ,LinearLayout.LayoutParams.MATCH_PARENT));
        ll2.setBackgroundColor(android.graphics.Color.GREEN);

        ll3 = new android.widget.LinearLayout(this);

        ll3.setLayoutParams(new android.widget.LinearLayout.LayoutParams(
                LinearLayout.LayoutParams.MATCH_PARENT
                ,LinearLayout.LayoutParams.WRAP_CONTENT));
        ll3.addView(new android.widget.Button(this));
        ll3.setBackgroundColor(android.graphics.Color.BLUE);

        ll.addView(ll1);
        ll.addView(ll2);
        ll.addView(ll3);

        setContentView(ll);

    }

    @Override
    public void onWindowFocusChanged(boolean hasFocus) {
        android.view.ViewGroup.LayoutParams params = ll2.getLayoutParams();
        params.height = ll2.getHeight() - ll1.getHeight();
        ll2.setLayoutParams(params);
    }
}
赤文字部分でレイアウトの高さを MATCH_PARENT「最大に広がる」から実際のピクセルの数値に変換しています。
が、しかし、一番下のレイアウトは表示もされませんので高さを取得する事すらできません。
そこで、一番上のレイアウトの高さで代用して計算しています。
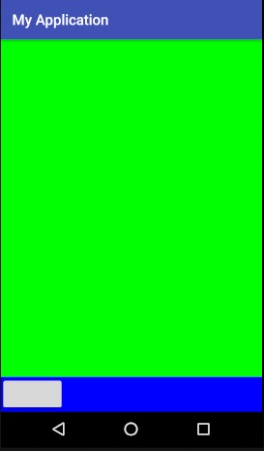
■下の部分のみにボタンを配置する
下の部分のみでは表示されずに高さを計算できないために一度上のレイアウトをダミーとして表示してから消すという方法を使って、高さを計算します。
その後にダミーのレイアウトを見えなくして「高さをゼロにして」実現したいと思います。
上のプログラムのonWindowFocusChangedの部分を書き換える事にします。
    @Override
    public void onWindowFocusChanged(boolean hasFocus) {
        if(ll1.getHeight()>0) {
            android.view.ViewGroup.LayoutParams params = ll2.getLayoutParams();
            params.height = ll2.getHeight();
            ll2.setLayoutParams(params);

            params = ll1.getLayoutParams();
            params.height =0;
            ll1.setLayoutParams(params);
        }
    }
起動した最初の一瞬だけダミーの一番上のレイアウトが表示されますが、とりあえず画面下にボタンを配置することができました。
なんだか面倒なことをやってますが、もっと簡単にそして確実にボタンを一番下に張り付ける方法もあると思います。
そもそも、XMLを使えば簡単にできますね。
XMLでリニアレイアウト
まずは、プログラムだけでこのような画面一番下にボタンを配置するレイアウトを作る事ができました。
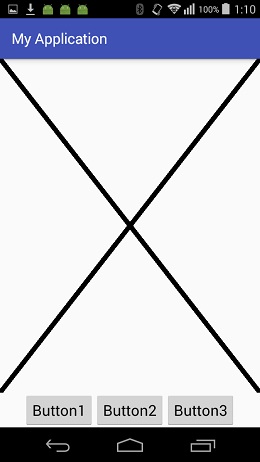
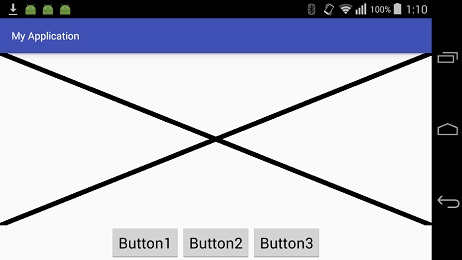
画面を傾けてみると。
以下がそのソースです。
public class MainActivity extends AppCompatActivity {
    android.widget.LinearLayout ll,ll1,ll2,ll3;
    @Override
    protected void onCreate(Bundle savedInstanceState) {
        super.onCreate(savedInstanceState);

        ll = new android.widget.LinearLayout(this);
        ll.setOrientation(android.widget.LinearLayout.VERTICAL);

        ll1 = new android.widget.LinearLayout(this);
        ll1.setLayoutParams(new android.widget.LinearLayout.LayoutParams(
                LinearLayout.LayoutParams.MATCH_PARENT
                ,LinearLayout.LayoutParams.WRAP_CONTENT));
        ll1.addView(new android.widget.Button(this));

        ll2 = new android.widget.LinearLayout(this);
        ll2.setLayoutParams(new android.widget.LinearLayout.LayoutParams(
                LinearLayout.LayoutParams.MATCH_PARENT
                ,LinearLayout.LayoutParams.MATCH_PARENT));

        ll2.addView(new uview(this));

        ll3 = new android.widget.LinearLayout(this);
        ll3.setLayoutParams(new android.widget.LinearLayout.LayoutParams(
                LinearLayout.LayoutParams.MATCH_PARENT
                ,LinearLayout.LayoutParams.WRAP_CONTENT));
        android.widget.Button button1,button2,button3;
        button1=new android.widget.Button(this);
        button2=new android.widget.Button(this);
        button3=new android.widget.Button(this);
        button1.setText("Button1");
        button2.setText("Button2");
        button3.setText("Button3");

        ll3.addView(button1);
        ll3.addView(button2);
        ll3.addView(button3);
        ll3.setGravity(android.view.Gravity.CENTER);
        ll.addView(ll1);
        ll.addView(ll2);
        ll.addView(ll3);

        setContentView(ll);
    }

    @Override
    public void onWindowFocusChanged(boolean hasFocus) {
        if(ll1.getHeight()>0) {
            android.view.ViewGroup.LayoutParams params = ll2.getLayoutParams();
            params.height = ll2.getHeight();
            ll2.setLayoutParams(params);

            params = ll1.getLayoutParams();
            params.height =0;
            ll1.setLayoutParams(params);
        }
    }
    private class uview extends android.view.View {
        public uview(android.content.Context c) {
            super(c);
        }
        public void onDraw(android.graphics.Canvas c) {
            android.graphics.Paint paint = new android.graphics.Paint();
            paint.setColor(android.graphics.Color.BLACK);
            paint.setStrokeWidth(10);
            c.drawLine(0, 0, c.getWidth(), c.getHeight(), paint);
            c.drawLine(c.getWidth(), 0, 0, c.getHeight(), paint);
        }
    }
}
▲トップページ
>
android